VR Remix Party 3.0
Introduction
“Remixing” is very simple (replacing the URL’s of existing assets i.e. images, audio and video with your own) and yet it is a powerful way to use storytelling to help students intuitively practice design thinking and coding basics. This three part workshop will show you the remix basics and provide a pathway to building your own lesson plans and asset libraries (360 images, audio and video) for most any subject or grade level.
This workshop includes…
- Part 1: Vacation VR Remix Party – Web VR template(s) with royalty free assets that can be “remixed” to create your own immersive content
- Part 2: Snapping 360 Images – How to use free and low cost tools to create your own VR asset libraries
- Part 3: Team Remix – Team lesson plan examples and strategies for a broad range of subject areas and grade levels
Tools you’ll need…
- Laptop/Desktop
- Glitch.com account
- Street View Download 360 software
- Smartphone with video
VR Remix Student Example
Part 1: Vacation VR Remix Party
View this extended version of the Vacation VR Remix Party Workshop with video.
Description: Vacation VR Remix Party is a great icebreaker activity that empowers students to explore the world while introducing them to coding basics. Students use the free web app maker Glitch.com to choose from scenic locations from around the world and “remix” their dream vacation.
Objectives:
- Build rapport among students
- Use the Internet to find information
- Use open source tools
- Utilize coding basic skills
Estimated Time: 20 minutes
What You’ll Need
- Computer or laptop
- Free account on the coding platform Glitch.com
- VR Remix Audio Template
Ice Breaker Questions
Below, are some questions to consider when introducing youth to this activity.
- What is your favorite kind of travel destination (city, mountains, beach, historical)
- Have you ever traveled outside of Texas or the United States?
- What is the farthest place you’ve traveled?
- If you could travel anywhere in the world, where would you go and why?
Look at examples of Vacation Remixes
Below is an example of a Vacation Remix template that you’ll use to complete the activity. Use your mouse to move around within the 360 environment and the Play/Mute buttons to hear the audio. The assets that you’ll be “remixing” are the 360 image, audio and text.
Remix Your Own
- Go to the URL https://glitch.com/~vacationvrremixparty. This will open a new tab on the website Glitch.com with our VR Remix Audio Player.
- Choose to Remix your own (lower right hand corner). This will create your own copy of the project with a new name, etc.
- Go to Assets over on the left-hand side of the screen.
- Scrll and you’ll see mp3 and image files (with tumbnails) in the directory. Mouse over the image files in that directory and click. You’ll see a thumbnail of the image/file. Click Copy Url button. This is the Url of the asset that you’ll be pasting into the index.html file.
- Go to index.html file (upper left side of the screen).
- Find <a-assets> tag. You’ll see an <img> tags and <audio> tag. The one with the id scene_01 represents the 360 image that is currently being used in the project. The Urls within the src tags are the ones you’ll want to replace with your own. Select the Url for the image you’d like to replace and paste your own into it.
- If you have an audio file, copy the Url from within the assets folder and locate the <audio> tag within the index.html file. Replace its Url with that of yours.
- To see what your remix looks like, click PREVIEW at the bottom of the screen. Chose to Open preview pane or Preview in new tab.
- Your application will load.
Part 2: Snapping Your Own 360 Images
Now that you’ve had a chance to learn some basics by copying and pasting URL’s within the code, we’ll cover snapping 360 images from Google Street View.
We all have places of significance in our lives and with the power of tools like Google Street View, it’s possible to virtually travel to those places in a matter of minutes. In this activity, you’ll help students identify a place of significance to them, navigate to that place, and download a 360 image of that place. In a longer version of this lesson, we encourage you to spend time modeling your own place significance. Virtually visit your place in Google Street View and describe to the students what is significant about it to you.
Estimated Time: 10 minutes
What You’ll Need
- Computer or laptop
- Google Maps to identify the URL you’d like to shoot
- Street View Download 360 on your Mac or PC to take snapshot
Steps
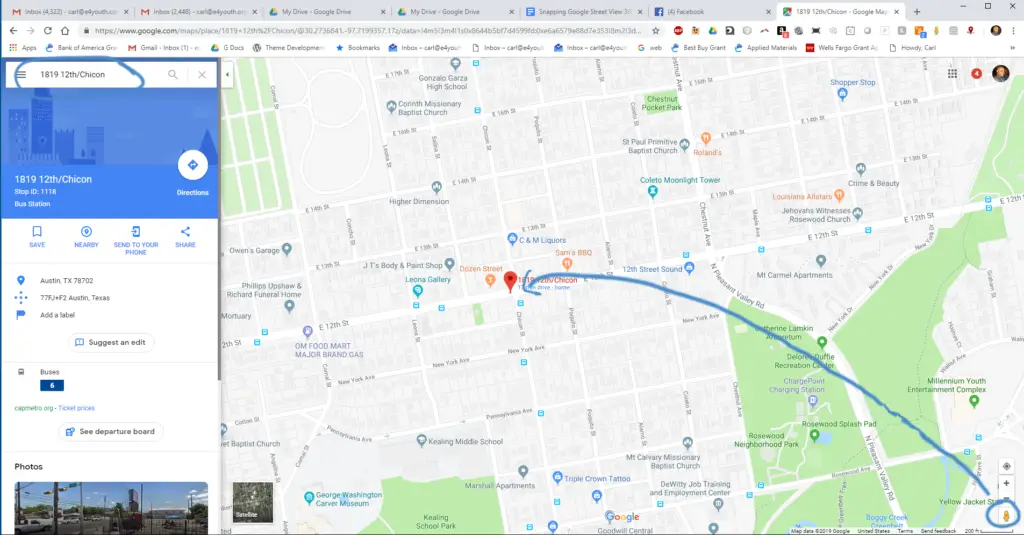
Google Maps
- Go to Google Maps and type in the address you’d like to view.
- In the lower right hand corner, you’ll see the Street View icon.
- Select the icon and place it where you’d like to snap a 360 image within the map. Once, you set it down, you will see the 360 view.
- Once you’ve settled on your shot, copy the URL in the browser.
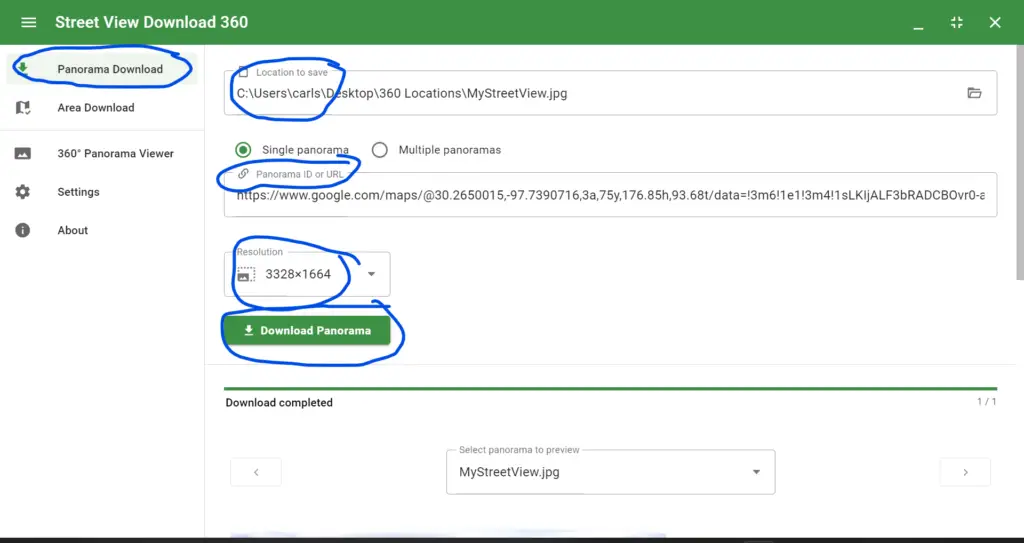
Street View Download 360
Open Street View Download 360 and it will open to the Panorama Download panel (upper left).
- Select where you’d like to save your 360 image on your computer.
- Paste the the URL in the “Panorama ID or URL field.
- Select the resolution of the image you’d like. Remember that if you select a high resolution, it may affect the performance of the app. We recommend 3328×1664)
- Click Download Panorama and that’s it!
Locate the jpeg file on your computer.
Part 3: Immersive Design Sprint
What You’ll Need
- VR Remix Video Player template
- Smartphone to record video

One comment